

Usage of Credit box for devices in 'Paid ISP support' category
This application note describes, how to work with programmable devices in ISP mode, that belong to 'Paid ISP support' category.Preface.
According to requests and needs of customers, programmable devices are more and more complex. Also, programmable devices range is more and more wide. As a result, we - the device programmers manufacturer - have to spend much more development resources for implementation of new programmable devices support compared to past. It is simply because support of these complex devices is more difficult to implement and number of devices we need to implement is also much higher.
In case of off-line/off-board programming (inZIF socket, using programming adapter), development costs spent for implementation of new devices support are also covered by programming adapters selling. But in case of programming in ISP mode (on-board), the customer buy only a programmer and after-selling programmer support costs, included in new versions of software, are covered by nothing.
What we changed and how it works.
To keep software update downloads for free also for devices programmed in ISP mode, we come to conclusion to apply a very small fee for programming of those devices, where the implementation of ISP support takes very long and/or for rarely used devices. At this place let me highlight, that we're adding support of 5000+ new devices yearly, more than 25% of them are devices supported in ISP mode. Only few of them, currently less than 10%, are in category of "paid ISP support" - and the upgrade SW for other ISP programmed devices is still free.
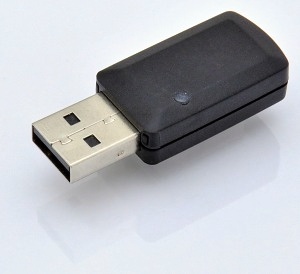
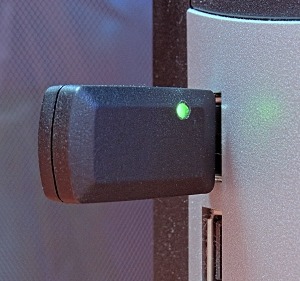
The system is simple. For work with such devices it is necessary to have the 'Credit box' attached to PC where device programmer is attached. The Credit box is technically a small dongle in USB port, that contains some amount of credits, from 25 thousands to 500 thousands, depending on the model. The micropayment for each such device programming is done by decreasing of credits amount in the Credit box. The number of credits used for programming of one device is usually 1 credit, but for some devices - complicated for implementation and not commonly used - can be 2 credits or more.
   |
The validity of Credit box is limited to 10 regular versions of software. It means, once the Credit box is activated at the time of first usage, it can be used by current and by next 9 consecutive regular versions of software. Example: activated by 3.01 version of software can be used by 3.01, 3.02, ..., up to 3.10 version of software, of course including all OnDemand versions of SW. There exist none time-limitation of Credit box usage.
Validity of Credit box for 10 versions of software also mean, that the Credit box allows user free software updates for ISP programmed devices for (approximately) one year.
There are three versions of Credit box available: the
The real fee for credit is very low, it starts at 0.01 USD per credit for
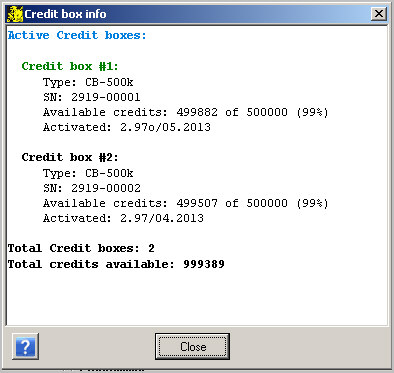
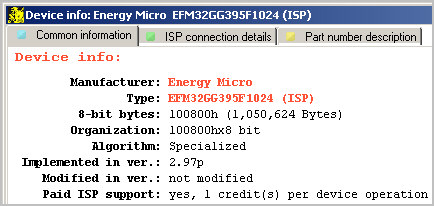
The need of Credit box usage for ISP programming of particular device, including all details, is indicated in PG4UW software in Device info part for selected device. During programming, the log window indicates also status of attached Credit box, so the status of programming, including remaining credits, are clearly visible. And of course, this information is also shown in the list of supported devices at the Elnec web site.
To be able to work using Credit box continuously, for example with programmers build into ATE system, it is possible to have two/several Credit boxes attached to one PC. One of them is active and used as the credits storage, the spare one is inactive. When the credits at active Credit box are depleted, then the other one is activated and used.
 |
Background and details.
Different companies use different models of the payment for new devices upgrade. The 'direct' payment models are for example some annual fees, for all supported devices or only for some group/family. Or every customer pays for the implementation of one/few devices some small amount. There are also many indirect, hidden - and therefore a bit incorrect - models, like short warranty period (1 year for example) combined with high out-of-warranty repair fees, termination of the SW support soon after discontinuing of programmer manufacturing that forces user to buy new model(s), ... .
It is also suitable to mention the quality of implementation and the quality of techsupport. Nice picture of smiling girl that promises 24/7 hotline, but in reality is only able to tell "passed to analyze, wait please" surely irritates more than help. We're proud to provide high-quality products with 3 years warranty as a standard, with fast high quality techsupport, and we think the most correct payment for all goods and services is based on the "how much you eat, so much you pay" principle.
The price of Credit box consists of fee for free software upgrade and credits, that are used as micropayments for devices programming. For those who program only small quantities,
How we decide which ISP device's support will be for free and for which the Credit box have to be used? To do proper decision it is necessary to take into account more aspects, both external and internal, for example how popular the device is (wide, average, speciality), how many of our customers ask for implementation, how complicated is the implementation of support (= how long does it take), whether ISP implementation can re-use the code done for off-line programming (inZIF socket), whether newly added device can share part of code with already supported devices in ISP mode, ... .
 |
As mentioned above, the simple-to-implement and widely-used devices - like IIC EEPROMs - are supported for free. But if implementation of (for example) very complex serial Data Flash took 3+ man-days of work, because of passwords, locks, special registers, etc. which had been (necessary) implemented, then - although pretty common device - the ISP support cannot be for free. The system is of course flexible - it means, if a rare and special device(s) become very popular during a time, initially set amount of credits per Device/Operation could be decreased.
FAQs.
Q: Which operations are credited, only Programming cycle or each attempt like Erase, Read, Verify? For example I only want to read MK60DN512 (ISP-EZP).
A: For proper implementation of programming operation it is necessary to implement also Erase operation (to be able to erase device before programming) and also Read operation (to be able to verify device after programming). Therefore if customer run Device/Read, it will be credited equally than he run Device/Program. Also: our programmers are frequently used as a verification tool, the programming is done by other brand programmer, verify operation is done by Elnec programmer. Therefore I think the all operations on the chip are equal from this point of view.
Q: The term "credit per Device/Operation" mean the credit would be deducted from the Credit box for main operations only?
A: Yes, of course. The Device/Operation mean main operations with device (Program, Read, Verify, Erase, Blank Check), regardless how many sub-operations - like "Erase before programming", "Blank check before programming", "Verify after read" - they include.
Example (for 1 credit per Device/Operation set):
Program (set: Erase and Blank check before programming and verify) = 1 credit
Read (including twice verify) = 1 credit
Blank Check = 1 credit
Q: I forgot to save the last valid version of SW for activated CreditBox, where can I get the SW version I need?.
A: We're sorry, but we don't keep older versions of SW for this purpose. We have last versions of software for Discontinued/Unsupported programmers - see please here and here.
Q: We work with Microchip and STM ISP programmers. Nobody ask to pay a fee per programmed IC.
A: What customer pay, when he buy Microchip microcontrollers? In every single piece of Microchip silicon you buy, you pay also the SW development for devices supported by PM3 programmer. The more devices sold, the more fee (also) for development the customers pay. Sure, it is not so visible like the payment using Credit box, but it is the same principle.
Q: I don't agree with this policy. Can you a price where I can programm the MCU's without Credit box?
A: Sorry, we don't plan to mix many policies for the same situation and for the same devices in intent to keep overview in software and pricing of our products/services.
Presov, April 2013. Last update: Nov. 2013
Author (comments to): J. Puobis, Elnec
Return to Application notes
